Git基础命令
Git基础命令
Git 基本操作
Git 的工作就是创建和保存你项目的快照及与之后的快照进行对比。
本章将对有关创建与提交你的项目快照的命令作介绍。
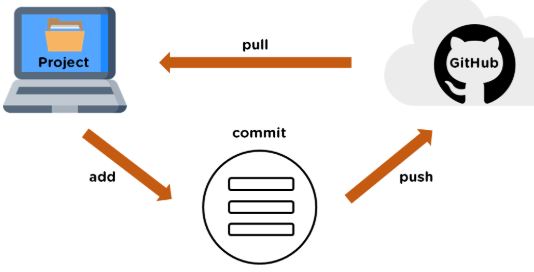
Git 常用的是以下 6 个命令:git clone、git push、git add 、git commit、git checkout、git pull,后面我们会详细介绍。
说明:
- workspace:工作区
- staging area:暂存区/缓存区
- local repository:版本库或本地仓库
- remote repository:远程仓库
一个简单的操作步骤:
git init
git add .
git commit- git init - 初始化仓库。
- git add . - 添加文件到暂存区。
- git commit - 将暂存区内容添加到仓库中。
创建仓库命令
下表列出了 git 创建仓库的命令:
| 命令 | 说明 |
|---|---|
git init | 初始化仓库 |
git clone | 拷贝一份远程仓库,也就是下载一个项目。 |
提交与修改
Git 的工作就是创建和保存你的项目的快照及与之后的快照进行对比。
下表列出了有关创建与提交你的项目的快照的命令:
| 命令 | 说明 |
|---|---|
git add | 添加文件到仓库 |
git status | 查看仓库当前的状态,显示有变更的文件。 |
git diff | 比较文件的不同,即暂存区和工作区的差异。 |
git commit | 提交暂存区到本地仓库。 |
git reset | 回退版本。 |
git rm | 删除工作区文件。 |
git mv | 移动或重命名工作区文件。 |
提交日志
| 命令 | 说明 | | -- | | | git log | 查看历史提交记录 | | git blame <file> | 以列表形式查看指定文件的历史修改记录 |
远程操作
| 命令 | 说明 |
|---|---|
git remote | 远程仓库操作 |
git fetch | 从远程获取代码库 |
git pull | 下载远程代码并合并 |
git push | 上传远程代码并合并 |
Git 分支管理
几乎每一种版本控制系统都以某种形式支持分支。使用分支意味着你可以从开发主线上分离开来,然后在不影响主线的同时继续工作。
有人把 Git 的分支模型称为必杀技特性,而正是因为它,将 Git 从版本控制系统家族里区分出来。
创建分支
git branch (branchname)切换分支
git checkout (branchname)当你切换分支的时候,Git 会用该分支的最后提交的快照替换你的工作目录的内容, 所以多个分支不需要多个目录。
合并分支
git merge你可以多次合并到统一分支, 也可以选择在合并之后直接删除被并入的分支。
开始前我们先创建一个测试目录:
$ mkdir gitdemo
$ cd gitdemo/
$ git init
Initialized empty Git repository...
$ touch README
$ git add README
$ git commit -m '第一次版本提交'
[master (root-commit) 3b58100] 第一次版本提交
 1 file changed, 0 insertions(+), 0 deletions(-)
 create mode 100644 README
列出分支
列出分支基本命令:
git branch没有参数时,git branch 会列出你在本地的分支。
$ git branch
* master
此例的意思就是,我们有一个叫做 master 的分支,并且该分支是当前分支。
当你执行 git init 的时候,默认情况下 Git 就会为你创建 master 分支。
如果我们要手动创建一个分支。执行 git branch (branchname) 即可。
$ git branch testing
$ git branch
* master
  testing
现在我们可以看到,有了一个新分支 testing。
当你以此方式在上次提交更新之后创建了新分支,如果后来又有更新提交, 然后又切换到了 testing 分支,Git 将还原你的工作目录到你创建分支时候的样子。
接下来我们将演示如何切换分支,我们用 git checkout (branch) 切换到我们要修改的分支。
$ ls
README
$ echo 'runoob.com' > test.txt
$ git add .
$ git commit -m 'add test.txt'
[master 3e92c19] add test.txt
 1 file changed, 1 insertion(+)
 create mode 100644 test.txt
$ ls
README        test.txt
$ git checkout testing
Switched to branch 'testing'
$ ls
README
当我们切换到 testing 分支的时候,我们添加的新文件 test.txt 被移除了。切换回 master 分支的时候,它们有重新出现了。
$ git checkout master
Switched to branch 'master'
$ ls
README        test.txt
我们也可以使用 git checkout -b (branchname) 命令来创建新分支并立即切换到该分支下,从而在该分支中操作。
$ git checkout -b newtest
Switched to a new branch 'newtest'
$ git rm test.txt
rm 'test.txt'
$ ls
README
$ touch runoob.php
$ git add .
$ git commit -am 'removed test.txt、add runoob.php'
[newtest c1501a2] removed test.txt、add runoob.php
 2 files changed, 1 deletion(-)
 create mode 100644 runoob.php
 delete mode 100644 test.txt
$ ls
README        runoob.php
$ git checkout master
Switched to branch 'master'
$ ls
README        test.txt
如你所见,我们创建了一个分支,在该分支上移除了一些文件 test.txt,并添加了 runoob.php 文件,然后切换回我们的主分支,删除的 test.txt 文件又回来了,且新增加的 runoob.php 不存在主分支中。
使用分支将工作切分开来,从而让我们能够在不同开发环境中做事,并来回切换。
删除分支
删除分支命令:
git branch -d (branchname)例如我们要删除 testing 分支:
$ git branch
* master
  testing
$ git branch -d testing
Deleted branch testing (was 85fc7e7).
$ git branch
* master
分支合并
一旦某分支有了独立内容,你终究会希望将它合并回到你的主分支。 你可以使用以下命令将任何分支合并到当前分支中去:
git merge
$ git branch
* master
  newtest
$ ls
README        test.txt
$ git merge newtest
Updating 3e92c19..c1501a2
Fast-forward
 runoob.php | 0
 test.txt   | 1 -
 2 files changed, 1 deletion(-)
 create mode 100644 runoob.php
 delete mode 100644 test.txt
$ ls
README        runoob.php
以上实例中我们将 newtest 分支合并到主分支去,test.txt 文件被删除。
合并完后就可以删除分支:
$ git branch -d newtest
Deleted branch newtest (was c1501a2).
删除后, 就只剩下 master 分支了:
$ git branch
* master
合并冲突
合并并不仅仅是简单的文件添加、移除的操作,Git 也会合并修改。
$ git branch
* master
$ cat runoob.php
首先,我们创建一个叫做 change_site 的分支,切换过去,我们将 runoob.php 内容改为:
<?php
echo 'runoob';
?>
创建 change_site 分支:
$ git checkout -b change_site
Switched to a new branch 'change_site'
$ vim runoob.php
$ head -3 runoob.php
<?php
echo 'runoob';
?>
$ git commit -am 'changed the runoob.php'
[change_site 7774248] changed the runoob.php
 1 file changed, 3 insertions(+)
将修改的内容提交到 change_site 分支中。 现在,假如切换回 master 分支我们可以看内容恢复到我们修改前的(空文件,没有代码),我们再次修改 runoob.php 文件。
$ git checkout master
Switched to branch 'master'
$ cat runoob.php
$ vim runoob.php    # 修改内容如下
$ cat runoob.php
<?php
echo 1;
?>
$ git diff
diff --git a/runoob.php b/runoob.php
index e69de29..ac60739 100644
--- a/runoob.php
+++ b/runoob.php
@@ -0,0 +1,3 @@
+<?php
+echo 1;
+?>
$ git commit -am '修改代码'
[master c68142b] 修改代码
 1 file changed, 3 insertions(+)
现在这些改变已经记录到我的 "master" 分支了。接下来我们将 "change_site" 分支合并过来。
$ git merge change_site
Auto-merging runoob.php
CONFLICT (content): Merge conflict in runoob.php
Automatic merge failed; fix conflicts and then commit the result.

$ cat runoob.php     # 打开文件,看到冲突内容
<?php
<<<<<<< HEAD
echo 1;
=======
echo 'runoob';
>>>>>>> change_site
?>
我们将前一个分支合并到 master 分支,一个合并冲突就出现了,接下来我们需要手动去修改它。
$ vim runoob.php
$ cat runoob.php
<?php
echo 1;
echo 'runoob';
?>
$ git diff
diff --cc runoob.php
index ac60739,b63d7d7..0000000
--- a/runoob.php
+++ b/runoob.php
@@@ -1,3 -1,3 +1,4 @@@
  <?php
 +echo 1;
+ echo 'runoob';
  ?>
在 Git 中,我们可以用 git add 要告诉 Git 文件冲突已经解决
$ git status -s
UU runoob.php
$ git add runoob.php
$ git status -s
M  runoob.php
$ git commit
[master 88afe0e] Merge branch 'change_site'
现在我们成功解决了合并中的冲突,并提交了结果。
Git 查看提交历史
Git 提交历史一般常用两个命令:
- git log - 查看历史提交记录。
- git blame <file> - 以列表形式查看指定文件的历史修改记录。
git log
在使用 Git 提交了若干更新之后,又或者克隆了某个项目,想回顾下提交历史,我们可以使用 git log 命令查看。
针对我们前一章节的操作,使用 git log 命令列出历史提交记录如下:
$ git log
commit d5e9fc2c811e0ca2b2d28506ef7dc14171a207d9 (HEAD -> master)
Merge: c68142b 7774248
Author: runoob <test@runoob.com>
Date:   Fri May 3 15:55:58 2019 +0800

    Merge branch 'change_site'

commit c68142b562c260c3071754623b08e2657b4c6d5b
Author: runoob <test@runoob.com>
Date:   Fri May 3 15:52:12 2019 +0800

    修改代码

commit 777424832e714cf65d3be79b50a4717aea51ab69 (change_site)
Author: runoob <test@runoob.com>
Date:   Fri May 3 15:49:26 2019 +0800

    changed the runoob.php

commit c1501a244676ff55e7cccac1ecac0e18cbf6cb00
Author: runoob <test@runoob.com>
Date: Fri May 3 15:35:32 2019 +0800- 我们可以用 --oneline 选项来查看历史记录的简洁的版本。
$ git log --oneline
$ git log --oneline
d5e9fc2 (HEAD -> master) Merge branch 'change_site'
c68142b 修改代码
7774248 (change_site) changed the runoob.php
c1501a2 removed test.txt、add runoob.php
3e92c19 add test.txt
3b58100 第一次版本提交
这告诉我们的是,此项目的开发历史。
我们还可以用 --graph 选项,查看历史中什么时候出现了分支、合并。以下为相同的命令,开启了拓扑图选项:
*   d5e9fc2 (HEAD -> master) Merge branch 'change_site'
|\
| * 7774248 (change_site) changed the runoob.php
* | c68142b 修改代码
|/
* c1501a2 removed test.txt、add runoob.php
* 3e92c19 add test.txt
* 3b58100 第一次版本提交
现在我们可以更清楚明了地看到何时工作分叉、又何时归并。
你也可以用 --reverse 参数来逆向显示所有日志。
$ git log --reverse --oneline
3b58100 第一次版本提交
3e92c19 add test.txt
c1501a2 removed test.txt、add runoob.php
7774248 (change_site) changed the runoob.php
c68142b 修改代码
d5e9fc2 (HEAD -> master) Merge branch 'change_site'- 如果只想查找指定用户的提交日志可以使用命令:git log --author , 例如,比方说我们要找 Git 源码中 Linus 提交的部分:
$ git log --author=Linus --oneline -5
81b50f3 Move 'builtin-*' into a 'builtin/' subdirectory
3bb7256 make "index-pack" a built-in
377d027 make "git pack-redundant" a built-in
b532581 make "git unpack-file" a built-in
112dd51 make "mktag" a built-in- 如果你要指定日期,可以执行几个选项:--since 和 --before,但是你也可以用 --until 和 --after。
- 例如,如果我要看 Git 项目中三周前且在四月十八日之后的所有提交,我可以执行这个(我还用了 --no-merges 选项以隐藏合并提交):
$ git log --oneline --before={3.weeks.ago} --after={2010-04-18} --no-merges
5469e2d Git 1.7.1-rc2
d43427d Documentation/remote-helpers: Fix typos and improve language
272a36b Fixup: Second argument may be any arbitrary string
b6c8d2d Documentation/remote-helpers: Add invocation section
5ce4f4e Documentation/urls: Rewrite to accomodate transport::address
00b84e9 Documentation/remote-helpers: Rewrite description
03aa87e Documentation: Describe other situations where -z affects git diff
77bc694 rebase-interactive: silence warning when no commits rewritten
636db2c t3301: add tests to use --format="%N"- 更多 git log 命令可查看:http://git-scm.com/docs/git-log
git blame
- 如果要查看指定文件的修改记录可以使用 git blame 命令,格式如下:
git blame <file>- git blame 命令是以列表形式显示修改记录,如下实例:
$ git blame README
^d2097aa (tianqixin 2020-08-25 14:59:25 +0800 1) # Runoob Git 测试
db9315b0 (runoob    2020-08-25 16:00:23 +0800 2) # 菜鸟教程
Git 标签
如果你达到一个重要的阶段,并希望永远记住那个特别的提交快照,你可以使用 git tag 给它打上标签。
比如说,我们想为我们的 runoob 项目发布一个"1.0"版本。 我们可以用 git tag -a v1.0 命令给最新一次提交打上(HEAD)"v1.0"的标签。
-a 选项意为"创建一个带注解的标签"。 不用 -a 选项也可以执行的,但它不会记录这标签是啥时候打的,谁打的,也不会让你添加个标签的注解。 我推荐一直创建带注解的标签。
git tag -a v1.0当你执行 git tag -a 命令时,Git 会打开你的编辑器,让你写一句标签注解,就像你给提交写注解一样。
现在,注意当我们执行 git log --decorate 时,我们可以看到我们的标签了:
*   d5e9fc2 (HEAD -> master) Merge branch 'change_site'
|\
| * 7774248 (change_site) changed the runoob.php
* | c68142b 修改代码
|/
* c1501a2 removed test.txt、add runoob.php
* 3e92c19 add test.txt
* 3b58100 第一次版本提交
如果我们忘了给某个提交打标签,又将它发布了,我们可以给它追加标签。
例如,假设我们发布了提交 85fc7e7(上面实例最后一行),但是那时候忘了给它打标签。 我们现在也可以:
$ git tag -a v0.9 85fc7e7
$ git log --oneline --decorate --graph
*   d5e9fc2 (HEAD -> master) Merge branch 'change_site'
|\
| * 7774248 (change_site) changed the runoob.php
* | c68142b 修改代码
|/
* c1501a2 removed test.txt、add runoob.php
* 3e92c19 add test.txt
* 3b58100 (tag: v0.9) 第一次版本提交
如果我们要查看所有标签可以使用以下命令:
$ git tag
v0.9
v1.0
指定标签信息命令:
git tag -a <tagname> -m "runoob.com标签"PGP签名标签命令:
git tag -s <tagname> -m "runoob.com标签"Git 远程仓库(Github)
Git 并不像 SVN 那样有个中心服务器。
目前我们使用到的 Git 命令都是在本地执行,如果你想通过 Git 分享你的代码或者与其他开发人员合作。 你就需要将数据放到一台其他开发人员能够连接的服务器上。
本例使用了 Github 作为远程仓库,你可以先阅读我们的 Github 简明教程
添加远程库
要添加一个新的远程仓库,可以指定一个简单的名字,以便将来引用,命令格式如下:
git remote add [shortname] [url]本例以 Github 为例作为远程仓库,如果你没有 Github 可以在官网 https://github.com/ 注册
由于你的本地 Git 仓库和 GitHub 仓库之间的传输是通过SSH加密的,所以我们需要配置验证信息:
使用以下命令生成 SSH Key:
ssh-keygen -t rsa -C "youremail@example.com"后面的 your_email@youremail.com 改为你在 Github 上注册的邮箱,之后会要求确认路径和输入密码,我们这使用默认的一路回车就行。
成功的话会在 ~/ 下生成 .ssh 文件夹,进去,打开 id_rsa.pub,复制里面的 key。
$ ssh-keygen -t rsa -C "429240967@qq.com"
Generating public/private rsa key pair.
Enter file in which to save the key (/Users/tianqixin/.ssh/id_rsa):
Enter passphrase (empty for no passphrase): # 直接回车
Enter same passphrase again: # 直接回车
Your identification has been saved in /Users/tianqixin/.ssh/id_rsa.
Your public key has been saved in /Users/tianqixin/.ssh/id_rsa.pub.
The key fingerprint is:
SHA256:MDKVidPTDXIQoJwoqUmI4LBAsg5XByBlrOEzkxrwARI 429240967@qq.com
The key's randomart image is:
+---[RSA 3072]----+
|E*+.+=**oo |
|%Oo+oo=o. . |
|%**.o.o. |
|OO. o o |
|+o+ S |
|. |
| |
| |
| |
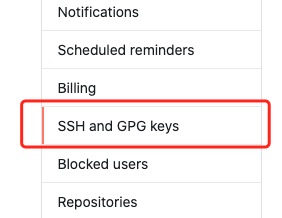
+----[SHA256]-----+回到 github 上,进入 Account => Settings(账户配置)。

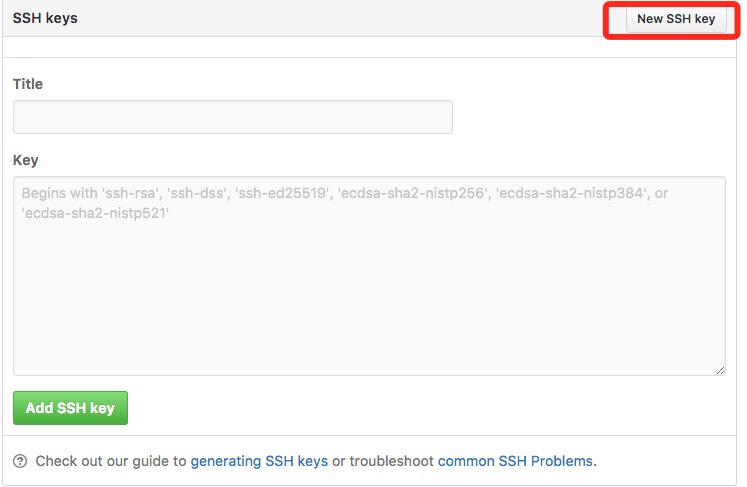
左边选择 SSH and GPG keys,然后点击 New SSH key 按钮,title 设置标题,可以随便填,粘贴在你电脑上生成的 key。
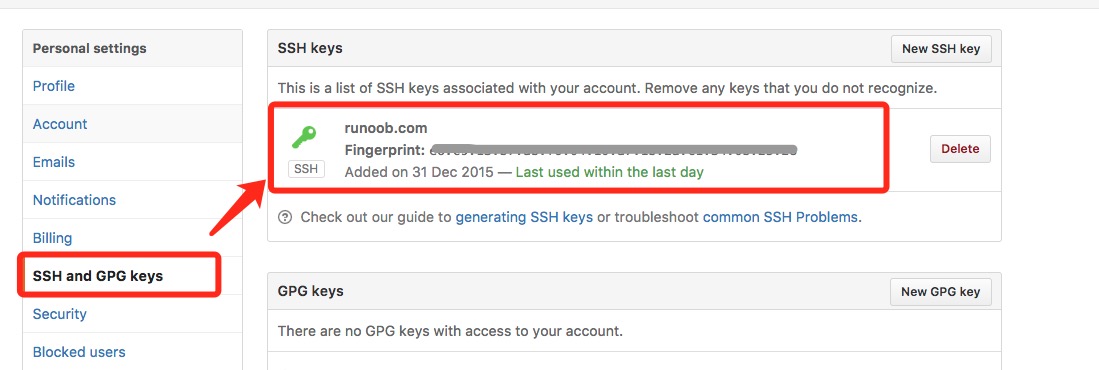
添加成功后界面如下所示
为了验证是否成功,输入以下命令:
$ ssh -T git@github.com
The authenticity of host 'github.com (52.74.223.119)' can't be established.
RSA key fingerprint is SHA256:nThbg6kXUpJWGl7E1IGOCspRomTxdCARLviKw6E5SY8.
Are you sure you want to continue connecting (yes/no/[fingerprint])? yes                   # 输入 yes
Warning: Permanently added 'github.com,52.74.223.119' (RSA) to the list of known hosts.
Hi tianqixin! You've successfully authenticated, but GitHub does not provide shell access. # 成功信息
以下命令说明我们已成功连上 Github。
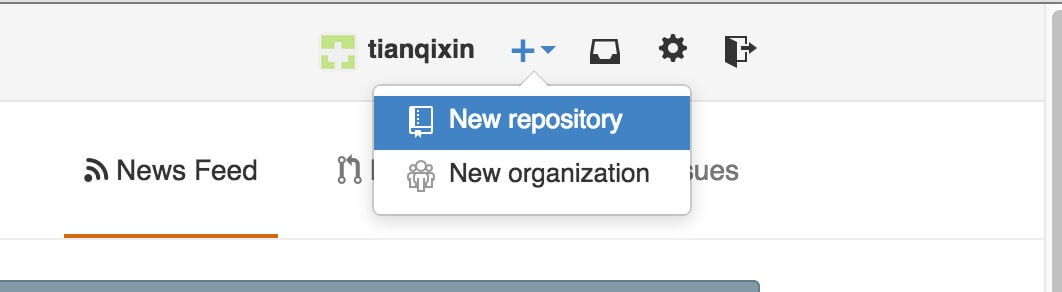
之后登录后点击" New repository " 如下图所示:
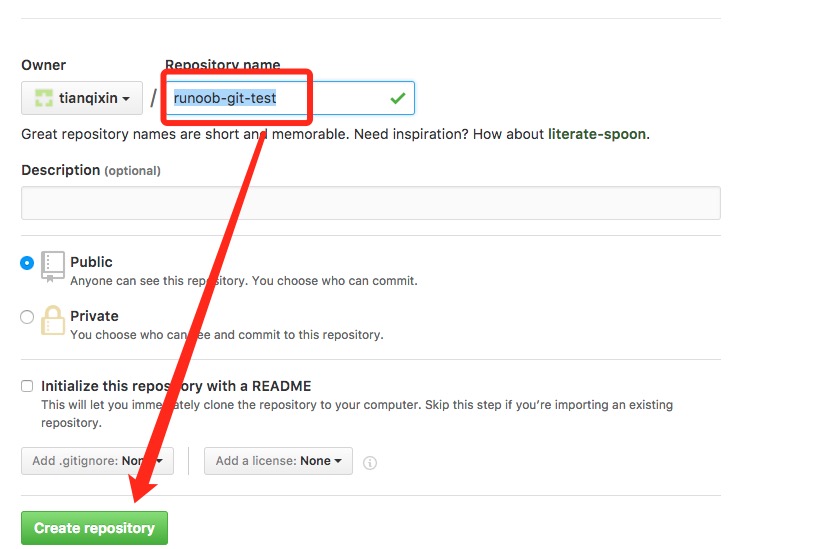
之后在在Repository name 填入 runoob-git-test(远程仓库名) ,其他保持默认设置,点击"Create repository"按钮,就成功地创建了一个新的Git仓库:
创建成功后,显示如下信息:
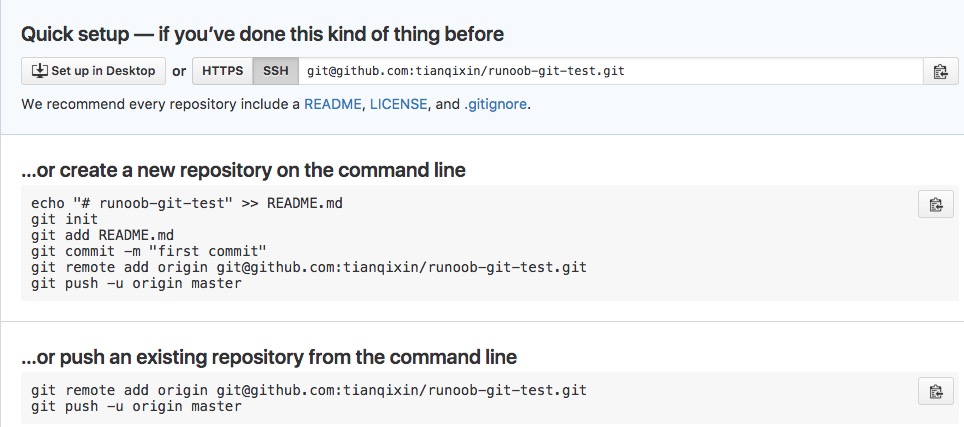
以上信息告诉我们可以从这个仓库克隆出新的仓库,也可以把本地仓库的内容推送到GitHub仓库。
现在,我们根据 GitHub 的提示,在本地的仓库下运行命令:
$ mkdir runoob-git-test                     # 创建测试目录
$ cd runoob-git-test/                       # 进入测试目录
$ echo "# 菜鸟教程 Git 测试" >> README.md     # 创建 README.md 文件并写入内容
$ ls                                        # 查看目录下的文件
README
$ git init                                  # 初始化
$ git add README.md                         # 添加文件
$ git commit -m "添加 README.md 文件"        # 提交并备注信息
[master (root-commit) 0205aab] 添加 README.md 文件
 1 file changed, 1 insertion(+)
 create mode 100644 README.md

# 提交到 Github
$ git remote add origin git@github.com:tianqixin/runoob-git-test.git
$ git push -u origin master
以下命令请根据你在Github成功创建新仓库的地方复制,而不是根据我提供的命令,因为我们的Github用户名不一样,仓库名也不一样。
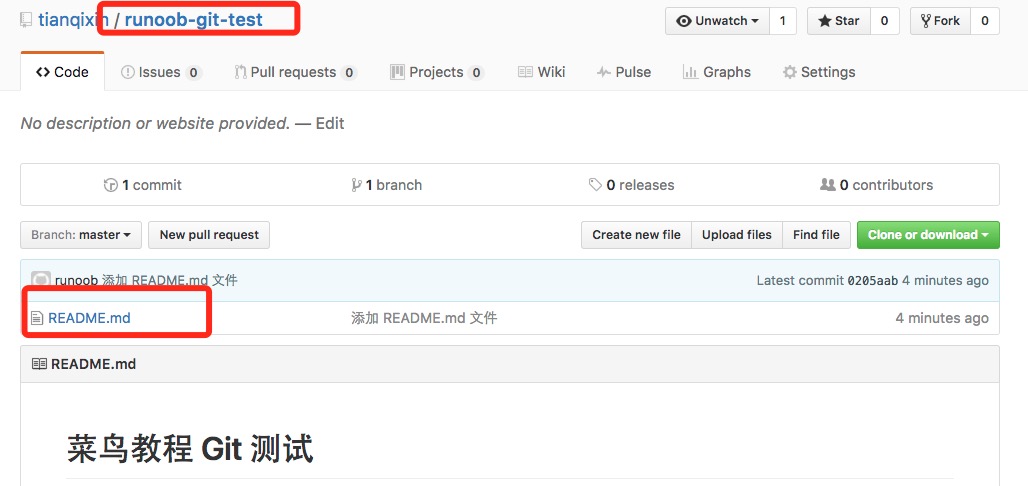
接下来我们返回 Github 创建的仓库,就可以看到文件已上传到 Github上:
查看当前的远程库
要查看当前配置有哪些远程仓库,可以用命令:
git remote实例
$ git remote
origin
$ git remote -v
origin    git@github.com:tianqixin/runoob-git-test.git (fetch)
origin    git@github.com:tianqixin/runoob-git-test.git (push)
执行时加上 -v 参数,你还可以看到每个别名的实际链接地址。
提取远程仓库
Git 有两个命令用来提取远程仓库的更新。
1、从远程仓库下载新分支与数据:
git fetch该命令执行完后需要执行 git merge 远程分支到你所在的分支。
2、从远端仓库提取数据并尝试合并到当前分支:
git merge该命令就是在执行 git fetch 之后紧接着执行 git merge 远程分支到你所在的任意分支。
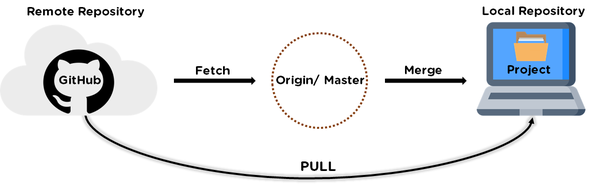
假设你配置好了一个远程仓库,并且你想要提取更新的数据,你可以首先执行 git fetch [alias] 告诉 Git 去获取它有你没有的数据,然后你可以执行 git merge [alias]/[branch] 以将服务器上的任何更新(假设有人这时候推送到服务器了)合并到你的当前分支。
接下来我们在 Github 上点击" README.md" 并在线修改它:
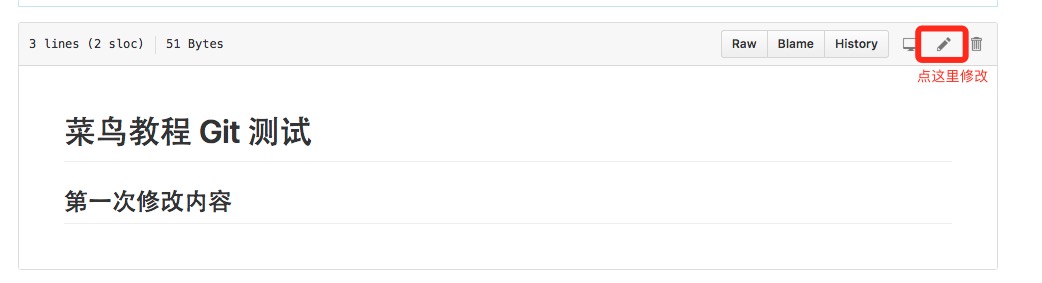
然后我们在本地更新修改。
$ git fetch origin
remote: Counting objects: 3, done.
remote: Compressing objects: 100% (2/2), done.
remote: Total 3 (delta 0), reused 0 (delta 0), pack-reused 0
Unpacking objects: 100% (3/3), done.
From github.com:tianqixin/runoob-git-test
   0205aab..febd8ed  master     -> origin/master
以上信息"0205aab..febd8ed master -> origin/master" 说明 master 分支已被更新,我们可以使用以下命令将更新同步到本地:
$ git merge origin/master
Updating 0205aab..febd8ed
Fast-forward
 README.md | 1 +
 1 file changed, 1 insertion(+)
查看 README.md 文件内容:
$ cat README.md
# 菜鸟教程 Git 测试
## 第一次修改内容
推送到远程仓库
推送你的新分支与数据到某个远端仓库命令:
git push [alias] [branch]以上命令将你的 [branch] 分支推送成为 [alias] 远程仓库上的 [branch] 分支,实例如下。
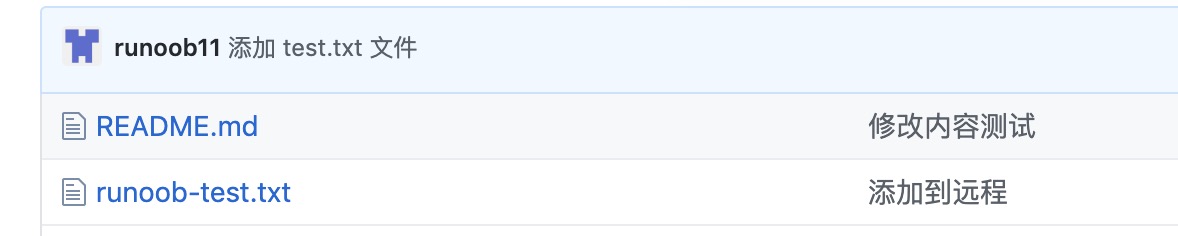
$ touch runoob-test.txt      # 添加文件
$ git add runoob-test.txt
$ git commit -m "添加到远程"
master 69e702d] 添加到远程
 1 file changed, 0 insertions(+), 0 deletions(-)
 create mode 100644 runoob-test.txt

$ git push origin master    # 推送到 Github
重新回到我们的 Github 仓库,可以看到文件已经提交上来了:
删除远程仓库
删除远程仓库你可以使用命令:
git remote rm [别名]实例
$ git remote -v
origin    git@github.com:tianqixin/runoob-git-test.git (fetch)
origin    git@github.com:tianqixin/runoob-git-test.git (push)

# 添加仓库 origin2
$ git remote add origin2 git@github.com:tianqixin/runoob-git-test.git

$ git remote -v
origin    git@github.com:tianqixin/runoob-git-test.git (fetch)
origin    git@github.com:tianqixin/runoob-git-test.git (push)
origin2    git@github.com:tianqixin/runoob-git-test.git (fetch)
origin2    git@github.com:tianqixin/runoob-git-test.git (push)

# 删除仓库 origin2
$ git remote rm origin2
$ git remote -v
origin    git@github.com:tianqixin/runoob-git-test.git (fetch)
origin    git@github.com:tianqixin/runoob-git-test.git (push)
更新日志
74547-于e62d8-于253d7-于6eb72-于392a5-于